
SUPPLIES (as pictured here)
Eye Shadow Quad in Sultry – Victoria’s Secret, $15
Dark Chocolate Brown Eyeliner – Victoria’s Secret, $8
Beauty Rush - Limited Edition Denimania Wet/Dry Shadow - Victoria's Secret, 2 for $12, 5 for $20
Pro Voluptuous FX Mascara – Victoria’s Secret, $12
SMOKY EYE for DAY
Step 1: prime your eyelid with a primer or foundation to help set the shadow and prevent creasing. Then add a subtle highlighting shadow all over with emphasis right under the arch in your brow.
Step 2: Next add a white highlighter on the inside corners of your lids to open them up and concealer under your eye (dab with your index finger). Finally, fill-in your brow (if you are going to do a smoky eye you need a balanced eyebrow to anchor the look).

Step 3: Gently pull the corner of your lid taut. Apply the eye shadow from the base of your lid to right above your crease. Start with a small amount just as a base coat and make a rainbow shape ensuring a gradual decrease of shadow from base to crease. Think of it as applying nail polish – the first coat doesn’t have to be cover perfectly and it won’t be the final color – it’s just the base.
:: Tip: Place a Kleenex under your eye as you are applying so the shadow doesn’t fall on your face.

Step 4: Now, take a darker shadow and apply over the top to fill in the base coat you applied. Again, being careful to create a perfect rainbow arch and gradient – if it’s blotchy or uneven it can ruin the look.
:: Tip: It is important to check and recheck how it looks during application. Take care not to touch the eye shadow to your brow and to avoid creating an 80s cat-eye swoop.
Step 5: Add a black liquid liner on the base of your lids with a slight upward wing on the corner of your eye.

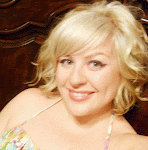
A profile of the subtle day-time look, appropriate for the office or a casual day of shopping.

SMOKY EYE for EVENING
Steps 1-5 plus
Step 6: Take a cream-based pencil and gently dot a line across the base of your lower lashes making sure to stay very close to the natural lash line. Then take a q-tip and in short strokes move side-to-side to remove the liner – the goal here is to leave a subtle shadow rather than a hard line.

Step 7: This step makes a big, visual difference and if you are going to be taking photos – it’s a must. Gently pull down your lower lid to expose the ridge on the inside of the lower eye lid. Dab with the outside of your finger to remove moisture and apply the liner from corner to corner.

Step 8: Curl your lashes. Apply mascara.

Step 9: Final touches. Use a cotton ball to clean-up any loose or excess shadow by lightly sweeping over the area. Make sure you have even coating and gradient from eye-to-eye. And ensure you have a nude or lightly glossed lip.
:: Tip: As a blonde I like to use a dark brown on bottom just to make sure I don’t appear to have raccoon eyes.

Trouble? In a smoky eye melt-down? Send me a tweet now at @eyekandeblog!
No comments:
Post a Comment